Search
Close this search box.

What is a Level 5 Drywall Finish? Understanding Drywall Levels Updated 2025

Introduction

Achieving a perfectly smooth and seamless wall surface is essential for a high-quality finish, and that’s where a Level 5 drywall finish comes in. Recognized as the highest standard in drywall finishing, Level 5 is the go-to choice for professionals and homeowners who demand flawless walls free from imperfections. This finish involves applying a skim coat over a Level 4 finish, creating an ultra-smooth surface ideal for high-end paint applications and specialty wall treatments.

A Level 5 finish is crucial in areas with strong lighting conditions, such as luxury homes, corporate offices, hospitals, and commercial spaces where glare and reflections can highlight even the most minor imperfections. It is also recommended for surfaces that receive glossy paint, metallic coatings, or decorative finishes, ensuring a pristine look without visible seams or texture inconsistencies.

Whether you’re a professional contractor or a DIY enthusiast looking to upgrade your drywall finish, understanding how to achieve a Level 5 finish can make all the difference. In this guide, we’ll explore what sets Level 5 apart, the tools and techniques required, and a step-by-step process to help you achieve a perfect, professional-quality drywall finish.

nqfiberglassmesh | What is a Level 5 Drywall Finish? Understanding Drywall Levels Updated 2025

Understanding Drywall Finish Levels

Drywall finishing is categorized into five levels, each designed for specific applications. Choosing the right level ensures the best results for unfinished spaces, textured walls, or high-end paint finishes.

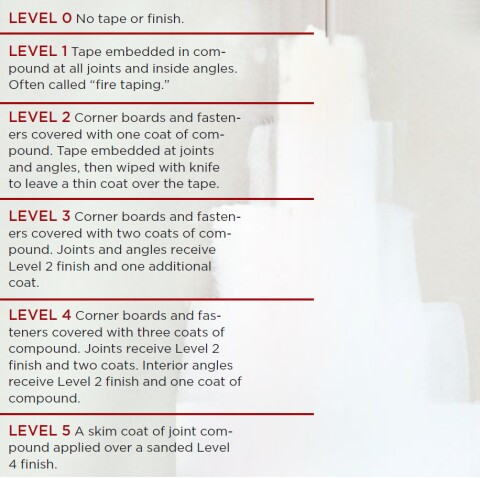
Overview of Drywall Levels 1-5

  • Level 1 – Basic Coverage

    • A single coat of joint compound is applied over fasteners and seams.
    • The tape is embedded, but the excess compound is not removed.
    • Used in hidden areas like attics, utility rooms, or spaces behind paneling.
  • Level 2 – Adds Tape, Suitable for Garages & Storage Areas

    • A second coat is applied over the tape, removing the excess compound.
    • Fasteners and joints are covered but not sanded smooth.
    • Works well for garages, basements, and areas that will be tiled.
  • Level 3 – Ideal for Heavy Texture Applications

    • Additional coats of compound are applied to seams and fasteners.
    • It is unsuitable for smooth paint finishes but works well for textured walls or ceilings.
  • Level 4 – Standard for Painted Walls

    • A final coat of compound is applied and sanded for smoothness.
    • It is ideal for flat or light-sheen paints and is ordinary in residential and commercial interiors.
  • Level 5 – The Ultimate Smooth Finish

    • A thin skim coat is applied over the entire drywall surface.
    • It eliminates imperfections, making it perfect for glossy or high-sheen finishes.
    • Required in high-end interiors and areas with direct lighting.
nqfiberglassmesh | What is a Level 5 Drywall Finish? Understanding Drywall Levels Updated 2025

Level 4 vs. Level 5 Drywall Finish: Pros & Cons

Feature

Level 4 Drywall Finish

Level 5 Drywall Finish

Smoothness

Smooth but may show minor imperfections

Ultra-smooth with a skim coat

Best for

Standard painted walls

High-gloss or specialty finishes

Lighting Suitability

Works well in standard lighting

Best for strong lighting & reflections

Cost & Labor

Less time-consuming, more affordable

More expensive and labor-intensive

When to Use

Regular rooms & office spaces

Luxury homes, commercial interiors, showrooms

While Level 4 is sufficient for most painted walls, Level 5 is essential for achieving a truly flawless, professional-grade finish. If you want a surface free from visible seams or texture variations, investing in a Level 5 finish is the best choice.

What is a Level 5 Drywall Finish?

Definition: What Makes Level 5 Different?

A Level 5 drywall finish is the highest and most refined level of drywall finishing, providing an ultra-smooth, uniform surface that eliminates visible imperfections. What sets it apart from Level 4 is the application of a skim coat over the entire drywall surface. This additional step fills in minor imperfections, smoothing out joint compounds, paper texture, and sanding marks that might otherwise be visible under certain lighting conditions.

A Level 5 finish is often necessary for high-end interiors, luxury homes, and commercial spaces requiring pristine wall finishes. It is imperative when using glossy, semi-gloss, or metallic paints, which tend to highlight surface flaws more than flat paints.

nqfiberglassmesh | What is a Level 5 Drywall Finish? Understanding Drywall Levels Updated 2025

What Does a Skim Coat Mean? (Explanation and Importance)

A skim coat is a thin, even layer of diluted joint compound (drywall mud) applied across the entire drywall surface. This process smooths out imperfections, covers joints, and creates a consistent texture.

Why is a Skim Coat Important?

  • Smooths the Entire Surface – Prevents visible seams and joint marks.
  • Essential for High-Gloss Paints – Eliminates surface inconsistencies that reflective finishes would highlight.
  • Fixes Minor Flaws – Covers tiny scratches, paper fuzz, or uneven areas from sanding.
  • Improves Paint Adhesion – Creates a uniform base that allows the paint to go on smoothly and evenly.

A skim coat can be applied using a trowel, roller, or airless sprayer, followed by sanding to achieve a polished, professional-grade finish.

When is a Level 5 Finish Necessary?

A Level 5 finish is not required for every project, but there are specific situations where it’s highly recommended:

  • Brightly Lit Rooms & Natural Light Exposure
    • Sunlight from large windows or direct overhead lighting can reveal imperfections.
  • Glossy, Semi-Gloss, or Metallic Paint Finishes
    • Unlike flat paints that hide flaws, reflective paints magnify every surface imperfection.
  • Commercial & High-End Residential Projects
    • Used in luxury homes, showrooms, corporate offices, and hospitality spaces where walls must appear flawless.
  • Media & Projection Walls
    • Imperfections can distort projected images, making Level 5 a must for home theaters or conference rooms.
  • Highly Detailed Interior Designs
    • If wallpaper, Venetian plaster, or high-end decorative coatings are planned, a Level 5 finish ensures a perfect foundation.

Homeowners and contractors can make informed decisions about their drywall finishing needs by understanding when and why a Level 5 drywall finish is necessary.

nqfiberglassmesh | What is a Level 5 Drywall Finish? Understanding Drywall Levels Updated 2025

Best Brands & Tools for Professionals vs. DIYers

Tool

Best for Professionals

Best for DIYers

Taping Knives & Blades

Columbia, Level 5 Tools

Hyde, Wal-Board

Drywall Roller

Wooster Pro, Purdy

Husky, Bates Choice

Sanding Tools

Festool, Mirka (power sanders)

3M, Hyde (manual sanders)

Joint Compound

USG Sheetrock, CertainTeed

DAP, ProForm

Primer

Zinsser, Benjamin Moore

Kilz, Behr

Using high-quality tools and materials will make the Level 5 finish process easier and more efficient. For DIYers, manual tools and pre-mixed joint compounds offer cost-effective solutions, while professionals benefit from skimming blades, power sanders, and specialized rollers for speed and precision.

Talk To Our Experts

Contact us now to get the latest drywall tape brochure and start choosing the right drywall tape for your project.

Step-by-Step Guide – How to Achieve a Level 5 Drywall Finish

A Level 5 drywall finish requires precision and patience, but following the correct steps can achieve a perfectly smooth surface ready for high-end painting or finishing. Below is a step-by-step guide to help professionals and DIYers alike.

  • Step 1: Prepare the Drywall Surface
  • Before applying any compound, ensure the drywall is installed correctly and prepped:
  • Check for imperfections – Fill dents or gaps with joint compound.
  • Remove dust – Use a soft brush or tack cloth to remove debris.
  • Ensure fasteners are flush – Screws should be slightly below the surface but not tearing the paper.
  • Step 2: Apply Drywall Tape & Joint Compound (How to Tape and Texture Sheetrock)
  • Taping ensures strong, invisible seams.
  • 1️⃣ Apply a thin layer of joint compound (mud) along drywall seams using a 6-inch taping knife.
  • 2️⃣ Embed drywall tape (paper or fiberglass mesh) over the seams and press it down firmly.
  • 3️⃣ Smooth out excess compound with the knife to prevent air bubbles.
  • 4️⃣ Cover screw holes and corners with joint compound.
  • 5️⃣ Allow it to dry completely before proceeding.

💡 Pro Tip: Use paper tape for strength and mesh tape for more straightforward application in high-moisture areas.

  • Step 3: Rolling Drywall Compound Evenly (Best Techniques)
  • Rolling drywall compounds help create a uniform skim coat across large areas.
  • 1️⃣ Use a high-nap roller (¾-inch or 1-inch) to apply a thinned-down joint compound.
  • 2️⃣ Work in sections to prevent drying too quickly.
  • 3️⃣ Roll inconsistent, overlapping strokes for even coverage.

💡 Pro Tip: Thin the compound slightly with water for a smoother application.

  • Step 4: Apply the Skim Coat (Best Practices)
  • A skim coat is the key to achieving a Level 5 finish.
  • 1️⃣ Using a 14-inch skimming blade or trowel, pull the rolled-on compound smoothly across the surface.
  • 2️⃣ Hold the blade at a 15-20° angle and apply light, even pressure.
  • 3️⃣ Work in long, overlapping strokes to minimize lines and inconsistencies.
  • 4️⃣ Allow the first coat to dry, then apply a second skim coat if needed.

💡 Pro Tip: Use a drywall hawk to hold the compound for quicker application.

  • Step 5: Sanding for a Drywall Smooth Finish
  • Sanding ensures an ultra-smooth surface before painting.
  • ✅ Use fine-grit sandpaper (220 grit or higher) for a polished finish.
  • ✅ For large areas, a pole sander or power drywall sander speeds up the process.
  • ✅ Lightly sand edges and seams to feather them into the surrounding drywall.
  • Wipe away dust with a damp sponge or tack cloth.

💡 Pro Tip: Avoid over-sanding, as it can expose drywall paper and cause uneven textures.

  • Step 6: Priming & Painting Tips
  • A Level 5 finish is incomplete without proper priming and painting.
  • ✅ Use a high-quality drywall primer to seal the surface and ensure even paint absorption.
  • ✅ For best results, apply two coats of primer, sanding lightly between coats.
  • ✅ Choose a matte or flat paint for minimal imperfections or semi-gloss for modern aesthetics.
  • ✅ If using high-gloss or dark colors, ensure the skim coat is perfectly smooth.

💡 Pro Tip: Avoid cheap primers, as they can lead to uneven absorption and visible imperfections.

nqfiberglassmesh | What is a Level 5 Drywall Finish? Understanding Drywall Levels Updated 2025

Common Mistakes & How to Avoid Them

Even experienced drywall finishers can make mistakes that affect the quality of a Level 5 drywall finish. Here are the most common errors and how to prevent them.

1. Skipping the Skim Coat

  • ✅ The Mistake: Some DIYers or contractors assume that a Level 4 finish (with joint compound and sanding) is smooth enough, skipping the skim coat.
  • 🚨 The Problem: Without a skim coat, the surface may show visible seams, imperfections, or uneven textures under bright lighting or glossy paint.
  • ✔️ How to Avoid It: Always apply a thin, even skim coat of joint compound over the entire surface using a roller and drywall blade.

2. Using the Wrong Tools

  • ✅ The Mistake: Some people try to apply joint compound with a paintbrush or low-quality knives, leading to uneven application. Others use cheap sandpaper, which can be too rough or ineffective.
  • 🚨 The Problem: Poor tools result in streaks, uneven surfaces, and excessive sanding work.
  • ✔️ How to Avoid It: Invest in high-quality taping knives, skimming blades, a pole sander or drywall sander, and a fine-grit sanding sponge (220 grit or higher) for the finishing touches.

3. Over-Sanding the Surface

  • ✅ The Mistake: In trying to get a perfectly smooth finish, some over sand and accidentally remove too much joint compound.
  • 🚨 The Problem: Oversanding exposes the drywall’s paper layer, causing fuzziness and an uneven finish when painted.
  • ✔️ How to Avoid It: Use light pressure and fine-grit sandpaper (220-320 grit), and check progress frequently. Sanding sponges help prevent over-sanding.

4. Not Allowing Proper Drying Time

  • ✅ The Mistake: Rushing the process and applying coats before the previous one fully dries.
  • 🚨 The Problem: This can lead to cracking, bubbling, or uneven surfaces as the compound shrinks while drying.
  • ✔️ How to Avoid It: Allow each layer of joint compound at least 24 hours to dry (or longer in humid conditions). In humid climates, use fans or dehumidifiers to speed up drying.
Final Tip: Patience and the proper techniques make all the difference when achieving a Level 5 drywall finish. Avoid these mistakes; you’ll get a smooth, professional result every time.
nqfiberglassmesh | What is a Level 5 Drywall Finish? Understanding Drywall Levels Updated 2025

Conclusion

Achieving a Level 5 drywall finish requires time, effort, and attention to detail, but the result is a flawless, smooth surface that enhances the quality of any space. Whether you’re working on high-end residential projects, commercial buildings, or areas with critical lighting, this finish ensures seamless walls perfect for painting and wall treatments.

To get the best results, invest in high-quality tools such as:

  • Professional-grade taping knives and drywall blades for smooth application
  • A high-nap roller to evenly spread the joint compound
  • A drywall sander (manual or electric) for a perfectly smooth surface
  • Premium joint compound and primer for lasting durability

Following the steps can help you achieve a professional finish at home if you’re confident in your DIY skills. However, hiring a skilled drywall contractor for larger projects or high-visibility areas can ensure a perfect result without the hassle.

Ready to take on your next drywall project? Whether tackling it yourself or hiring a professional, a Level 5 finish is the gold standard for smooth, high-quality walls. Get started today! 

Talk To Our Experts

Connect with an NQ expert to discuss your product needs and get started on your project.

Table of Contents
We are committed to delivering exceptional support and top-tier service whenever you need it!
en_USEN
Index