- +86-13775339109
- Jessica@nq-fiberglass.cn
- No 61 Fangxian, Danyang, Jiangsu
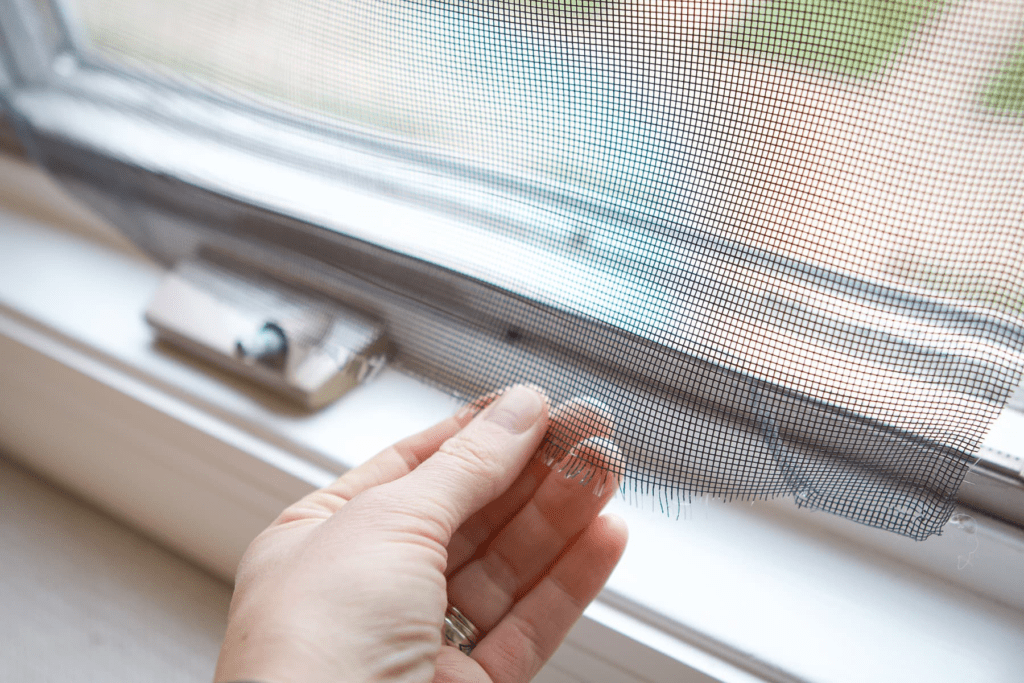
A damaged window screen can be a real nuisance—allowing insects to enter your home, reducing airflow, and diminishing the overall appearance of your windows. Whether your screen has rips, holes, or general wear and tear, replacing it is a quick and easy DIY project that can be done in just 10 minutes with the right tools.
Instead of spending money on professional repairs, you can fix a window screen yourself using simple materials. This cost-effective solution improves your home’s ventilation while keeping pests out. In this guide, we’ll walk you through a step-by-step process to replace your window screen quickly and efficiently—without any specialized skills.
Ready to get started? Let’s dive in!

Before you begin replacing your window screen, make sure you have the right screen replacement tools and materials for a smooth and efficient process.
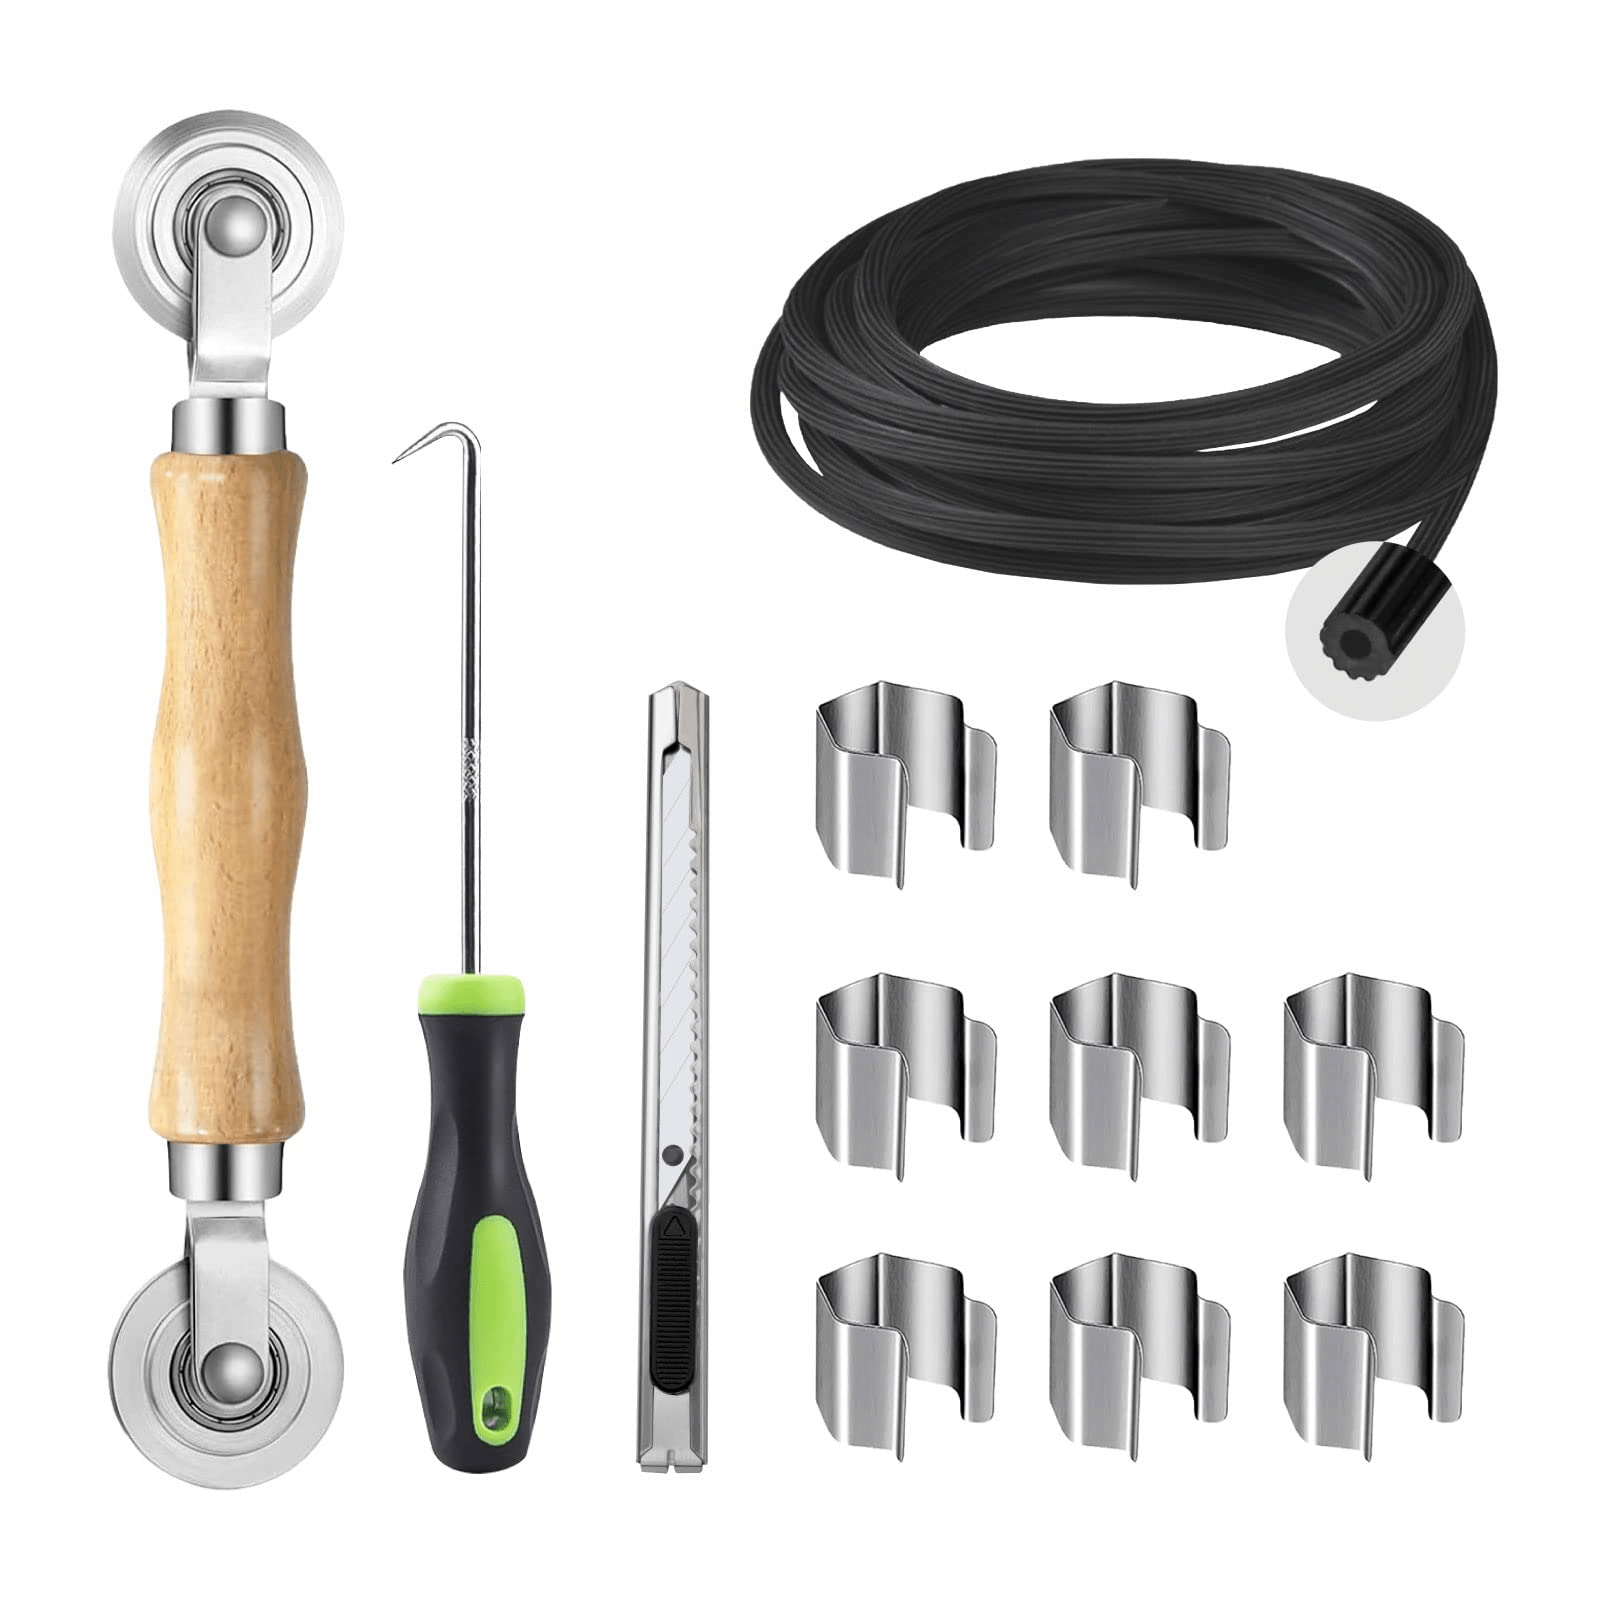
You’ll need the following screen replacement tools:
✔ Spline roller – Helps press the spline (rubber cord) into the frame for a secure fit.
✔ Utility knife – For trimming excess screen material neatly.
✔ Flathead screwdriver – Assists in removing the old screen and spline.
✔ Measuring tape – Ensures you cut the screen to the correct size.
✔ Scissors – Useful for cutting the screen material before installation.

When selecting window screen material, fiberglass mesh is the best option due to its flexibility, durability, and affordability. Here’s why it stands out:
✅ Easy to Install – Unlike aluminum mesh, fiberglass is flexible and won’t crease easily during installation.
✅ Durable & Weather-Resistant – Resistant to rust, corrosion, and extreme temperatures, making it perfect for long-term use.
✅ Better Visibility & Airflow – Provides clear visibility while allowing fresh air to circulate efficiently.
✅ Pet & Tear-Resistant Options – Available in reinforced versions that withstand pet scratches and accidental damage.
Other options include:
You can purchase fiberglass mesh window screens and related materials from:
Equipped with the right tools and materials, you’re now ready to remove the old window screen and install a new one!
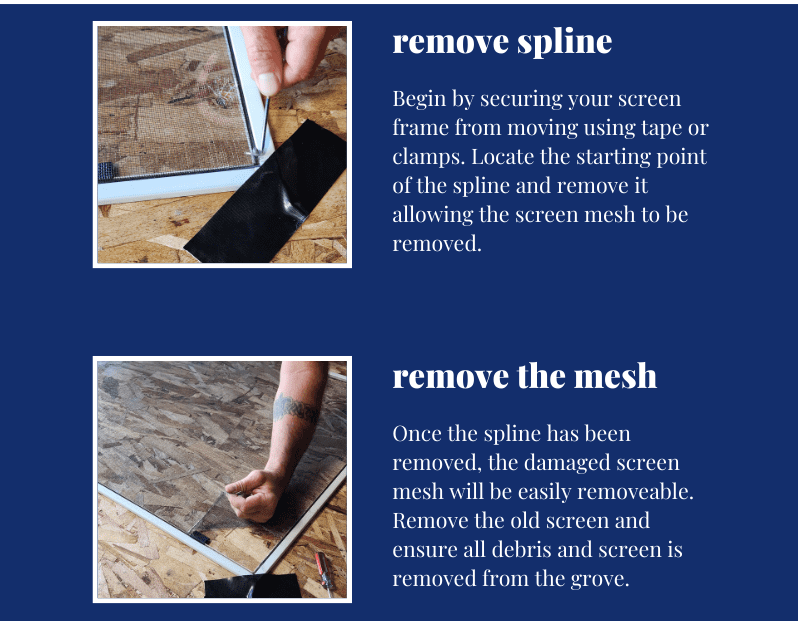
Before installing a new window screen, you first need to remove the damaged one. Follow this simple step-by-step guide to ensure a smooth removal process.
If you’re removing window screens for storage (such as during winter months), follow these tips to prevent damage:
By properly removing and storing your window screens, you ensure easy reinstallation and extend their lifespan. Now, let’s move on to installing the new screen!

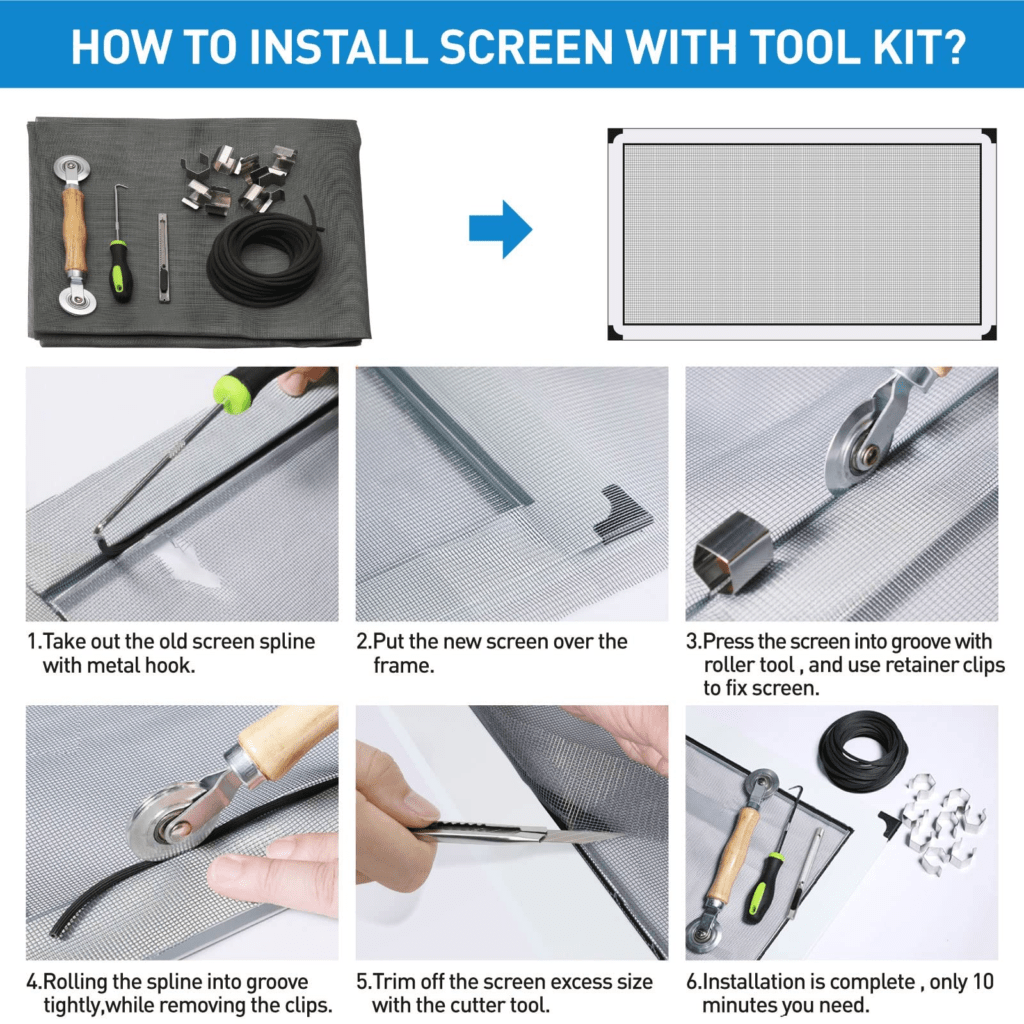
Replacing a window screen is a quick and easy DIY project. Follow this step-by-step guide to complete the job in just 10 minutes with a professional-looking result.
📏 Measure the Window Frame – Use a measuring tape to determine the exact width and height of your window screen frame. Add an extra inch on all sides to allow for adjustments.
✂ Cut the Replacement Screen – Lay the fiberglass mesh or other window screen material on a flat surface and cut it slightly larger than the frame using scissors or a utility knife. Keeping it larger helps ensure a proper fit once secured.
🖐 Lay the Screen Over the Frame – Position the new screen material over the frame, ensuring even coverage.
📌 Hold the Screen in Place – Use small clamps or tape to keep the screen taut and prevent it from shifting.
💡 Tip: How to Rescreen a Window Without Bowing
🔗 Insert the Spline – Take a rubber spline and press it into the frame’s groove, starting from one corner.
🛞 Roll the Spline into Place – Using a spline roller, firmly roll the spline into the groove to lock the screen in place. Work gradually around the frame to avoid wrinkles.
🔧 Check for a Tight Fit – Ensure the screen is smooth and wrinkle-free before proceeding to the final step.
✂ Trim the Excess Screen – Use a utility knife to carefully cut away any extra material along the outside edge of the spline.
📌 How to Put a Screen Back in the Window
1️⃣ Align the bottom edge of the screen frame with the window track.
2️⃣ Tilt the frame slightly and press it back into place.
3️⃣ Secure the screen by locking the tabs or sliding it into the grooves.
4️⃣ Double-check that the screen fits snugly and evenly in the window frame.
🎉 That’s it! You’ve successfully replaced your window screen in just 10 minutes. Your window is now protected with a fresh, durable, and secure screen.
Next, let’s go over how to fix a hole in a screen if you’re dealing with minor damage rather than a full replacement.

Even after replacing a window screen, you may encounter common problems like small holes, bowing, or ripped screens. Here’s how to fix them quickly and effectively.
Small holes in a window screen can allow insects and debris to enter your home. Instead of replacing the entire screen, try these quick fixes:
If your window screen is ripped, you can repair or replace it depending on the extent of the damage:
By addressing these common screen problems, you can extend the lifespan of your window screens and keep them in top condition.
Selecting the right window screen is essential for durability, airflow, and overall functionality. Below are key factors to consider and recommendations for the best window screen based on different needs.
✅ Durability – Choose a high-quality material that can withstand weather conditions, UV exposure, and frequent use. Fiberglass mesh is a popular option due to its flexibility and resistance to rust.
🌬 Airflow & Visibility – If ventilation and clear visibility are your top priorities, opt for fiberglass screens with a fine mesh that allows maximum airflow while keeping bugs out.
🐾 Pet-Proofing – If you have pets, a pet-resistant screen made from heavy-duty vinyl-coated polyester is a great choice. It’s thicker and more durable than standard mesh, preventing scratches and tears.
☀ Sun Protection – For homes in hot climates, solar screens can help block UV rays, reduce indoor temperatures, and lower energy costs.
🦟 Bug Protection – If you live in an area with small insects like gnats, consider a fine-mesh insect screen to prevent even the tiniest bugs from entering.
Need | Recommended Window Screen Type |
Standard use | Fiberglass mesh (affordable, easy to install) |
High durability | Aluminum screen (stronger but less flexible) |
Pet-friendly | Pet-resistant screen (tear-resistant, durable) |
Better airflow & visibility | Ultra-fine fiberglass screen (max airflow, minimal obstruction) |
Sun protection | Solar screen (reduces heat, UV rays) |
Extra insect protection | No-see-um screen (fine mesh for small bugs) |
Looking for high-quality fiberglass mesh screens? Get them directly from NQ Fiberglass Mesh, a trusted manufacturer of durable and reliable window screen materials.
By choosing the right window screen, you can improve indoor comfort, enhance durability, and ensure long-lasting protection for your home.
Replacing a window screen is a quick, cost-effective DIY project that takes just 10 minutes when using the right screen replacement tools and materials. Here’s a quick recap of the steps:
1️⃣ Remove the old screen carefully to avoid damage.
2️⃣ Measure and cut the new screen to fit your window frame.
3️⃣ Secure the screen with a spline roller for a tight, wrinkle-free fit.
4️⃣ Trim excess material and reinstall the screen securely.
With this guide, you can fix a ripped window screen, rescreen a window without bowing, and ensure long-lasting durability. Whether you’re dealing with small holes, warped screens, or needing a pet-resistant upgrade, choosing the best window screen material makes all the difference.
Why wait? Try replacing your window screen today!
Looking for high-quality fiberglass mesh screens? Visit NQ Fiberglass Mesh to get durable, reliable materials for your next screen replacement project.
For more DIY home repair guides, check out our other tutorials on drywall finishing, waterproofing, and home maintenance tips.
Contact us now to get the latest Fiberglass Mesh window screens and start your project immediately.
© All Rights Reserved.