Search
Close this search box.

Steel Mesh & Expanded Metal Plastering for Masonry Wall Reinforcement

(1) Introduction

1.Brief Overview of Masonry Wall Reinforcement

Masonry wall reinforcement is a key aspect of construction. It ensures that walls withstand environmental stresses. It also ensures weight load and structural variation. Unreinforced masonry walls are prone to cracks due to temperature changes, shrinkage or settlement. Thus, the service life and safety of buildings are affected. To solve these problems, reinforcement such as steel mesh and expanded metal can be embedded in the gypsum or mortar layer. To provide additional tensile strength and distribute the load more evenly.

The reinforced masonry not only improves the durability of the walls, but also supports the flexibility of the building. It can use lighter materials and reduce maintenance costs. And ensure the structural performance of walls in high stress areas. Such as foundations, facades and corners. The application of steel reinforcement is essential to modern construction. Especially in areas with frequent seismic activity or large temperature fluctuations.

2. Importance of Steel Mesh and Expanded Metal in Plastering and Structural Integrity

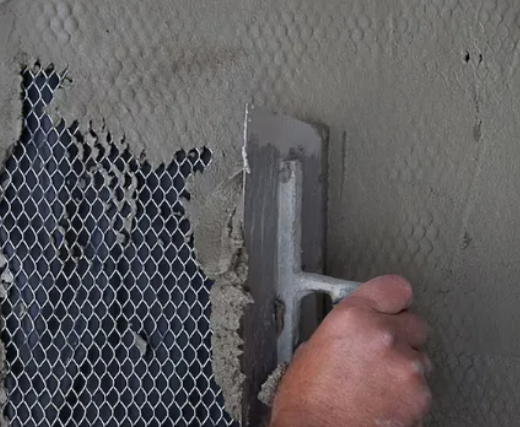
Wire mesh and expanded metal play a big role in reinforcing the application of plaster. And also in structural stability. Wire mesh, usually made of galvanized or stainless steel, reinforces the plaster layer. Thus preventing cracking and ensuring a smooth and durable surface. It also acts as a stress relief layer. Thus improving the overall load-bearing capacity of the masonry wall.

Expanded metal has a diamond-shaped structure and has excellent bonding properties. It forms a strong bond between the plaster and the masonry. Its perforated design improves stress distribution and reduces the risk of delamination. And enhances resistance to thermal expansion and vibration. This makes it ideal for curved surfaces where structural reliability and aesthetics are equally important. And suitable for facades and decorative features. In addition, these materials contribute to sustainable building practices by extending the life of the wall and reducing the need for maintenance. By embedding wire mesh or expanded metal during the construction process, builders can ensure the resilience of residential and commercial projects. While maintaining the aesthetics of the wall.
nqfiberglassmesh | Steel Mesh & Expanded Metal Plastering for Masonry Wall Reinforcement

(2) What Is Masonry Wire Mesh and Expanded Metal?

1.Definition and Types of Materials

  • Masonry wire mesh is a grid of steel wires welded or woven together, commonly used in masonry walls to enhance their strength and stability. It is typically made from galvanized steel or stainless steel, offering resistance to corrosion and durability in harsh environmental conditions. The mesh is available in various sizes and configurations, such as square or rectangular openings, catering to different construction needs.
  • Expanded metal is created by cutting and stretching a solid metal sheet into a mesh with diamond-shaped openings. This process results in a lightweight yet strong material that provides excellent bonding properties. Made from materials such as steel, aluminum, or stainless steel, expanded metal is commonly used in plastering applications to support the adhesion of mortar to masonry surfaces.

2.Key Differences Between Steel Mesh and Expanded Metal

While both steel mesh and expanded metal are used for masonry reinforcement, they differ significantly in design and application:

2.1Structure:


  • Steel mesh consists of welded or woven wires with uniform grid patterns, making it ideal for even stress distribution.
  • Expanded metal features diamond-shaped openings formed from a single sheet, offering superior bonding with plaster.

2.2Applications:


  • Steel mesh is often used in load-bearing masonry walls or areas requiring high tensile strength.
  • Expanded metal is favored for plastering curved or decorative surfaces due to its flexibility and strong adhesive properties.

3.Advantages for Masonry Reinforcement

Both materials provide critical benefits for masonry reinforcement:

  • Crack Prevention: Steel mesh and expanded metal help mitigate cracks caused by shrinkage, temperature changes, or vibrations by reinforcing the plaster and distributing stress evenly.
  • Durability: These materials enhance the longevity of masonry walls by increasing their tensile strength and resistance to environmental factors.
  • Improved Adhesion: Expanded metal’s perforated design improves mortar adhesion, making it ideal for surfaces prone to delamination.
  • Versatility: Both options are adaptable for use in residential, commercial, and industrial projects, supporting a wide range of architectural designs.

(3)Why Reinforce Masonry Walls with Mesh?

1.Preventing Structural Issues Like Cracks

Reinforcing masonry walls with mesh is essential to address common structural challenges, particularly cracking. Over time, masonry structures experience stress due to temperature changes, settling, or load variations, which can lead to unsightly and dangerous cracks. Steel or fiberglass mesh embedded within the wall helps distribute stress evenly across the surface, reducing the risk of localized cracking. This reinforcement acts as a support framework, improving the wall’s resistance to shear stress and preventing damage caused by material movement.

2.Enhancing Plaster Adhesion and Durability

Mesh significantly improves the bond between the plaster layer and the masonry surface, ensuring a durable finish. The mesh provides a textured base that holds the plaster firmly, reducing the chances of peeling, swelling, or delamination. This is particularly important in environments with fluctuating humidity or temperature, as it allows the plaster to maintain adhesion over time. Fiberglass mesh is particularly effective for thin plaster layers, while steel mesh is better suited for thicker applications.

3.Improving Wall Strength and Stability

By integrating mesh into masonry walls, builders can enhance the structural stability of the entire assembly. Mesh reinforcement not only increases the wall’s load-bearing capacity but also ensures that the structure can withstand environmental and mechanical stresses. For example, expanded metal (Exmet) mesh and steel mesh are often used in high-load areas like bridges, industrial buildings, and tall structures. These materials prevent the spread of cracks and add rigidity, helping walls resist deformation under stress.

Incorporating mesh reinforcement is a cost-effective way to extend the lifespan and safety of masonry walls, making it an indispensable component in modern construction practices. For applications ranging from residential to industrial projects, selecting the appropriate mesh type—whether fiberglass, plastic, or steel—ensures optimal performance based on the specific requirements.

(4)Common Issues in Masonry Walls

1. Causes of Horizontal Cracks in Plaster Walls

Horizontal cracks in plaster walls are common and often stem from the following causes:

  • Settlement of the Foundation: Uneven foundation settlement exerts pressure on walls, causing horizontal cracks at stress points, such as between masonry units or near floor and ceiling joints.
  • Thermal Expansion and Contraction: Temperature fluctuations lead to expansion and contraction of masonry materials, creating tensile forces that result in cracks along weaker mortar joints or plaster layers.
  • Structural Overloads: Excessive weight or improper load distribution can create horizontal stress fractures, particularly in multi-story buildings or walls supporting heavy structures.
  • Improper Construction Practices: Use of substandard materials, inadequate curing, or poor alignment during construction contributes to long-term cracking issues.

2. Challenges with Concrete Block Walls and How Mesh Mitigates These

Concrete block walls, while durable, present unique challenges that mesh reinforcement effectively addresses:
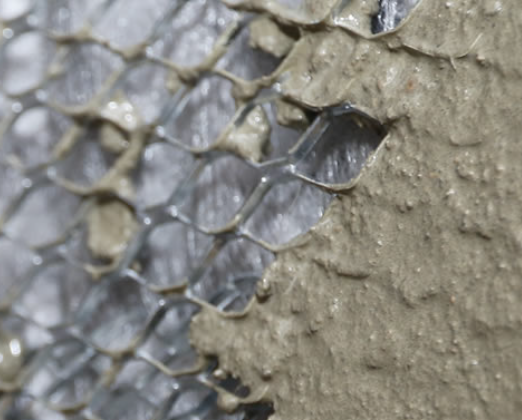
  • Weak Bond Between Mortar and Blocks: The smooth surface of concrete blocks often leads to weak adhesion with plaster. Reinforcing with mesh provides a textured base, ensuring a strong bond and preventing delamination.
  • Crack Propagation: Concrete blocks are prone to shrinkage cracks or those caused by thermal stress. Mesh, particularly steel or fiberglass, acts as a stress distributor, preventing cracks from spreading and maintaining wall integrity.
  • Resistance to Environmental Factors: Walls exposed to high humidity or temperature variations risk peeling or swelling of plaster. Mesh reinforcement ensures better durability by stabilizing the plaster layer and reducing moisture infiltration.
  • Structural Weak Points: Concrete block walls often have weaker joints that can compromise stability under heavy loads or seismic forces. Reinforcement mesh improves load-bearing capacity and enhances resistance to shear forces.
nqfiberglassmesh | Steel Mesh & Expanded Metal Plastering for Masonry Wall Reinforcement

(5)Choosing the Right Mesh for Your Project

When selecting mesh for masonry reinforcement, it’s critical to evaluate several factors to ensure durability, functionality, and cost-effectiveness. Below are insights into the key considerations and types of mesh to guide your decision-making.

1. Factors to Consider

  • Wire Gauge and Strength: The thickness of the wire (gauge) directly impacts the mesh’s strength and durability. Heavier gauges are better for load-bearing walls, while lighter ones suit non-structural applications.
  • Material Type:

    • Galvanized Steel: Offers excellent corrosion resistance, suitable for outdoor or humid environments.
    • Stainless Steel: Ideal for high-moisture or chemically exposed areas, providing long-lasting performance.
    • PVC-Coated Mesh: Combines metal strength with additional protection and aesthetic appeal.
  • Wall Conditions: Assess the type of wall (e.g., concrete blocks or brickwork), its load-bearing needs, and exposure to environmental factors like moisture or temperature extremes.

  • Aperture Size: The opening size in the mesh influences its flexibility and the level of reinforcement provided. Smaller apertures increase overall rigidity and stability.

2. Comparing Types of Mesh

  • Masonry Wire Mesh: Commonly used for reinforcing concrete walls, providing excellent tensile strength to prevent cracking.
  • Concrete Block Mesh: Designed for embedding into mortar joints of block walls, enhancing structural stability.
  • Expanded Metal Mesh: Lightweight yet strong, suitable for plaster applications, offering enhanced adhesion and crack resistance.

3. Advantages of Choosing the Right Mesh

  • Enhanced Strength: Properly selected mesh reinforces walls, improving resistance to structural stresses.
  • Longevity: Materials like galvanized or stainless steel reduce corrosion risks, ensuring durability.
  • Cost Efficiency: While initial investment may vary, selecting the appropriate mesh minimizes long-term repair and maintenance costs.

For optimal results, align the mesh choice with your project’s specific requirements and consult suppliers who provide tailored solutions for masonry applications. Proper material selection enhances both the structural integrity and longevity of your masonry walls.

(6)How to Attach Wire Mesh to a Concrete Wall

Attaching wire mesh to a concrete wall is an essential process for reinforcement and ensuring the strength of the structure. Here’s a comprehensive step-by-step guide on how to do it effectively:

1.Tools and Materials Needed:

  • Wire mesh (cut to size)
  • Tape measure
  • Drill with masonry bit
  • Screws or nails for securing
  • Screwdriver or hammer
  • Safety gloves and goggles
  • Ladder (if working on high walls)
  • Wire cutters for adjusting mesh size

2.Step-by-Step Guide:

2.1Preparing the Surface:

  • Clean the concrete wall to ensure that it is free of dirt, debris, and loose material. This step helps ensure a good bond between the mesh and the surface.
  • Use a tape measure to measure the area of the wall where you intend to attach the mesh.

2.2Cutting and Positioning the Mesh:

  • Cut the wire mesh to fit the dimensions of the area using wire cutters. It’s important that the mesh fits snugly in the space and does not hang loosely.
  • Position the mesh against the wall, ensuring that it is level and aligned correctly.

2.3Securing the Mesh:

  • Mark where the screws or nails will go around the perimeter of the mesh.
  • Using a drill with a masonry bit, create pilot holes in the wall. The size of the hole should match the diameter of the screws or nails you’re using.
  • Secure the mesh by driving screws or nails into the holes, ensuring it is tightly fixed against the wall.

2.4Ensuring Proper Overlap and Tension:

  • If multiple sections of mesh are used, ensure there is at least a 6-inch overlap where the pieces meet. This overlap strengthens the bond and ensures the mesh provides maximum reinforcement.
  • Make sure the mesh remains taut across the surface. Any slack can reduce its effectiveness in reinforcing the concrete.

2.5Common Mistakes to Avoid:

  • Poor positioning: Ensure the mesh is correctly aligned before securing it. Misalignment can cause uneven reinforcement.
  • Not securing edges: Failing to fix the edges of the mesh properly can result in it coming loose over time.
  • Overlooking safety: Always wear safety gloves and goggles when working with tools and wire mesh to avoid injury.

Proper installation of wire mesh will reinforce the wall, prevent cracking, and increase the overall structural integrity.

(7)Application Process: Plastering Over Mesh

Plastering over mesh is an essential technique for achieving a durable, smooth, and crack-resistant finish. Here’s a step-by-step guide on how to apply plaster over mesh effectively:

1.Tools and Materials Needed:

  • Plaster mix (with bonding agent, if necessary)
  • Mesh (fiberglass or metal mesh)
  • PVA glue or adhesive
  • Trowel and float
  • Speed skin or plastering trowel
  • Measuring tape and scissors

2.Step-by-Step Guide:

2.1Prepare the Surface:

  • Ensure the wall is clean and free of loose debris. If needed, remove any old paint and patch up cracks or holes.
  • Apply a bonding agent like PVA glue to the wall for better adhesion between the mesh and surface. Let it dry before proceeding.

2.2Cut and Position the Mesh:

  • Roll out the mesh and cut it to fit the wall area. For fiberglass mesh, you can use sharp scissors or a knife to trim the mesh neatly.
  • Position the mesh on the wall, ensuring proper overlap at the seams (typically 50mm). This overlap ensures the mesh stays secure when plastered over.

2.3Secure the Mesh:

  • Secure the mesh with adhesive or thin-set mortar. In some cases, you may use nails or staples to anchor the mesh in place, especially for larger applications or heavier mesh.
  • Make sure the mesh is taut and flat against the wall to avoid any wrinkles or gaps.

2.4Apply the First Coat of Plaster:

  • Mix the plaster according to the instructions, adding bonding agents if needed.
  • Using a trowel, apply the first layer of plaster to the mesh, ensuring the mesh is fully embedded into the plaster.
  • Use short, stumpy sweeps to ensure the plaster is evenly spread across the mesh. Make sure there are no gaps or air pockets.

2.5Smooth the Surface:

  • After the first coat has firmed up but is still workable, smooth out any rough areas with a speed skin or float. This ensures a smooth, even surface.
  • For any fraying mesh or joints that might be visible, apply scrim tape over the problem areas before proceeding with the second coat.

2.6Apply the Second Coat:

  • Once the first coat is dry, apply a second coat of plaster. This coat should be thinner and applied to create a smooth finish. Use standard plastering techniques, ensuring the finish is even and seamless.

3.Tips for a Smooth and Durable Finish:

  • Avoid thick layers: Applying plaster too thickly in one layer can lead to cracking. Ensure even coats and allow proper drying times between layers.
  • Ensure mesh is flat: The mesh must be secured tightly without wrinkles to avoid future issues with the finish.
  • Pay attention to drying times: Rushing the drying process can result in cracking or poor adhesion between layers.

This method of plastering over mesh not only enhances the durability of the plaster but also prevents issues like cracking, ensuring a long-lasting finish for walls or ceilings.

StepDetails
Tools and Materials NeededPlaster mix (with bonding agent, if necessary), Mesh (fiberglass or metal mesh), PVA glue or adhesive, Trowel and float, Speed skin or plastering trowel, Measuring tape and scissors
1. Prepare the SurfaceEnsure the wall is clean and free of loose debris. Remove old paint and patch cracks or holes. Apply a bonding agent (e.g., PVA glue) to the wall and let it dry.
2. Cut and Position the MeshRoll out and cut the mesh to fit the wall. Use scissors or a knife for fiberglass mesh. Ensure proper overlap at seams (50mm) for secure placement.
3. Secure the MeshUse adhesive or thin-set mortar to secure the mesh. Alternatively, use nails or staples for larger applications. Ensure the mesh is taut and flat.
4. Apply the First Coat of PlasterMix plaster according to instructions. Apply the first layer, ensuring the mesh is fully embedded. Spread plaster evenly with a trowel and avoid air pockets.
5. Smooth the SurfaceSmooth out rough areas after the first coat firms up using a speed skin or float. Address frayed mesh or visible joints with scrim tape.
6. Apply the Second CoatOnce the first coat is dry, apply a thinner second coat for a smooth finish. Use standard plastering techniques for an even result.
Tips for a Smooth and Durable Finish– Avoid thick layers: Too much plaster in one layer can crack

(8)Addressing Cracks and Maintenance

Repairing Horizontal Cracks in Plaster Walls

  1. Identify the Cause: Horizontal cracks in plaster walls can result from structural shifts, settling, or improper load distribution. Inspect for potential underlying issues like foundation problems or water damage before proceeding with repairs.

  2. Prepare the Area: Use a utility knife or chisel to widen the crack slightly, ensuring loose plaster is removed. Clean the crack thoroughly to remove debris or dust for better adhesion.

  3. Apply Repair Materials:

    • Adhesive Caulk: For small cracks, fill them with adhesive caulk using a caulking gun. This provides flexibility and prevents future cracking.
    • Joint Compound: For wider cracks, apply a setting-type joint compound with a putty knife. Smooth and level the area with a trowel.
  4. Reinforce if Necessary: In cases of recurring or significant cracks, consider reinforcing the area using mesh tape or washers and screws to ensure stability.

  5. Finishing Touches: After the compound has dried, sand the area lightly for a smooth finish. Prime and paint to match the surrounding wall.

Routine Inspection and Upkeep of Reinforced Walls

  1. Regular Inspections: Check for signs of wear, such as new cracks, discoloration, or bulging. Pay special attention to areas near windows, doors, and structural joints.

  2. Address Moisture Issues: Ensure proper waterproofing around windows, doors, and roofs to prevent water infiltration that can weaken plaster and lead to cracks.

  3. Maintain Humidity Levels: Keep indoor humidity between 30-40% to prevent drying or shrinking of plaster, which can cause cracks. Use humidifiers in dry seasons or dehumidifiers if excess moisture is present.

  4. Reapply Protective Coatings: If walls are exposed to harsh weather, periodic reapplication of sealants or paint can help protect them from environmental damage.

  5. Professional Assistance: For extensive damage or recurring issues, consult a professional to evaluate and address the root cause effectively.

These steps ensure a long-lasting, crack-free finish while preserving the integrity of masonry walls.

(9)FAQs

1.Can you use wire mesh on all types of walls?

Wire mesh is versatile and can be applied to a variety of wall types, including brick, concrete, and plasterboard. However, the choice depends on the specific wall condition and purpose. For instance, welded wire mesh is ideal for concrete reinforcement due to its tensile strength, while lighter meshes can be used for plastering over uneven surfaces to enhance durability and prevent cracking.

2.What’s the lifespan of reinforced plaster walls?

Reinforced plaster walls, when properly installed and maintained, can last several decades. The lifespan depends on factors such as the quality of materials, exposure to environmental elements, and regular upkeep. Wire mesh and expanded metal reinforcement minimize cracking and enhance durability, significantly extending the wall’s life.

3.Is expanded metal better than wire mesh?

The choice between expanded metal and wire mesh depends on the application:

  • Expanded metal provides superior adhesion for plaster due to its textured surface and is ideal for applications requiring high durability.
  • Wire mesh is generally more cost-effective and suitable for standard masonry or plastering tasks, where the focus is on preventing cracking rather than heavy reinforcement.

(10) Conclusion

Steel mesh and expanded metal are indispensable for reinforcing masonry walls, ensuring structural stability, and enhancing the longevity of plastered surfaces. Steel mesh offers excellent tensile strength and flexibility, making it ideal for preventing cracks and distributing loads evenly in standard applications. Expanded metal, with its rigid and textured design, provides superior plaster adhesion and is perfect for heavy-duty or intricate masonry projects.

Both materials address common issues in masonry, such as horizontal cracks and poor plaster adhesion, by improving overall wall strength and resistance to environmental stresses. The application of these reinforcements also facilitates smoother plaster finishes and minimizes maintenance needs over time.

By choosing the appropriate mesh type based on factors like wall conditions, load requirements, and project scope, homeowners and builders can achieve durable, aesthetically pleasing, and cost-effective results. Leveraging these reinforcements not only enhances construction quality but also reduces the need for frequent repairs, ensuring long-term performance and value.